Make This In An Hour
One of my friends has been saying for a couple months that he would make his website over spring break. Now it's the end of spring break and he hasn't started. His birthday is tomorrow, and I've decided to be not a good friend and give the gift of accountability by writing down step-by-step instructions to make it as simple as possible.
It really only takes an hour to make a website. I know because I timed myself doing the following and the whole process took me just under an hour to make this website. (I even did the registering a new domain and creating a new GitHub account for a good measure!) You can view the code for this website on GitHub.
Website Instructions
- Go to namecheap.com and register a domain. This is optional and only if you want a custom domain name.
- Make a GitHub account and download Git if you haven't already.
- Create a directory to hold your website and cd into it.
mkdir my-site && cd
          my-site
. All future commands will assume you are within this directory. - Make a new GitHub repository for your site titled yourusername.github.io. For example, my GitHub account is smilli, so my repository is named smilli.github.io.
- While in the directory for your website run
git initandgit remote add origin https://github.com/username/username.github.io.gitwith username replaced by your username. - Make a file called
index.htmlin your website's folder with the HTML for your main page. Don't spend long on this; it can be as simple as the following: - Enter whatever text or html you want in the file. You can view the
changes you're making locally by running
python -m http.server 8000if you're using Python 3 andpython -m SimpleHTTPServer 8000for Python 2. Then navigate to http://localhost:8000 in your browser. - Now run the following commands:
git add . git commit -m "Initial commit" git push -u origin master
- Go to https://yourusername.github.io/. You should now see your site! Congratulations, you put something online.
<!DOCTYPE html>
<html>
<head>
  <meta charset="utf-8">
  <title>YOUR SITE TITLE</title>
  <!-- Add some style to your site, see http://getbootstrap.com for details -->
  <link rel="stylesheet"
  href="https://maxcdn.bootstrapcdn.com/bootstrap/3.3.4/css/bootstrap.min.css">
</head>
<body>
  <h1>YOUR SITE TITLE</h1>
  <p>Your text blahblahbhalbha</p>
  <p>Another paragraph!  Maybe more text!</p>
</body>
</html>
Adding your Custom Domain
- Go to namecheap.com and register a domain if you don't have one yet.
- Create a file called
CNAMEin all caps in your website directory. Then add a single line that saysyourdomainname.com(nohttporwww) to the file. For example the CNAME file for this website looks like this:makethisinanhour.comView details on CNAME configuration here. - Like before, push your changes to Github.
git add .
git commit -m "Add CNAME"
git push
- Now login to https://www.namecheap.com/ and click
on the domain you want under the
list of your domains. The list of domains should look like this:
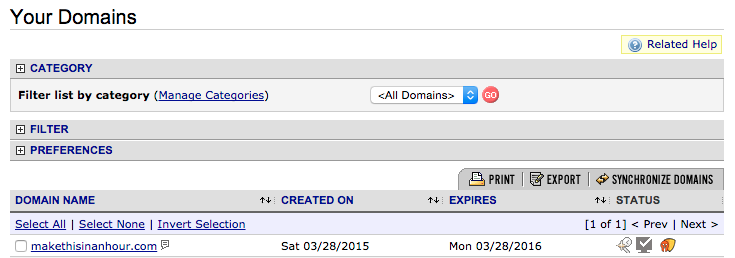
After clicking on your domain, you should see a link that says "All Host Records" on the left sidebar underneath "Host Management". Click this. Now you should see the default records that Namecheap adds for your site.

Modify your records to look like this (with username replaced by your username of course):

- After the DNS changes propagate, you will be able to see your website on your domain! Congrats :)